This post may contain affiliate links. Please read our disclosure policy.
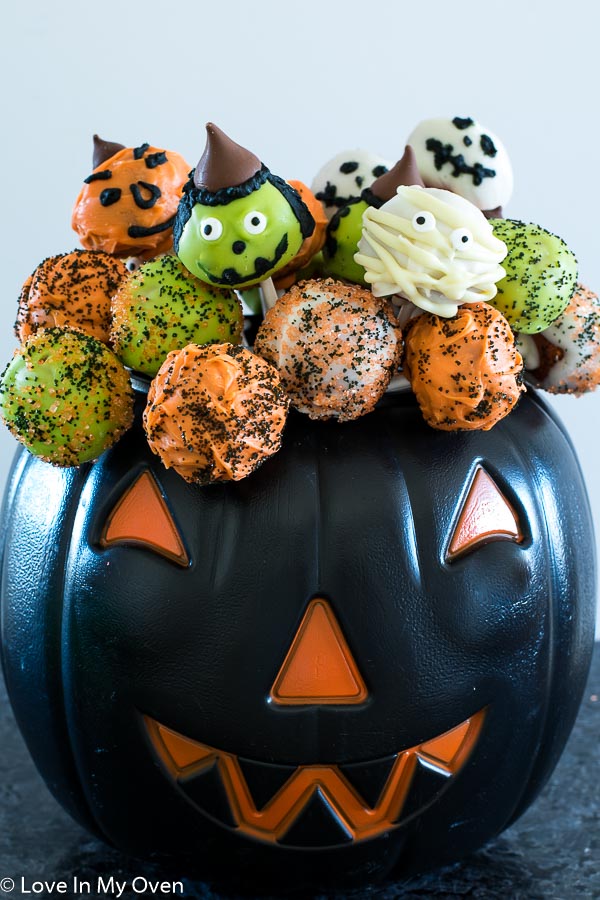
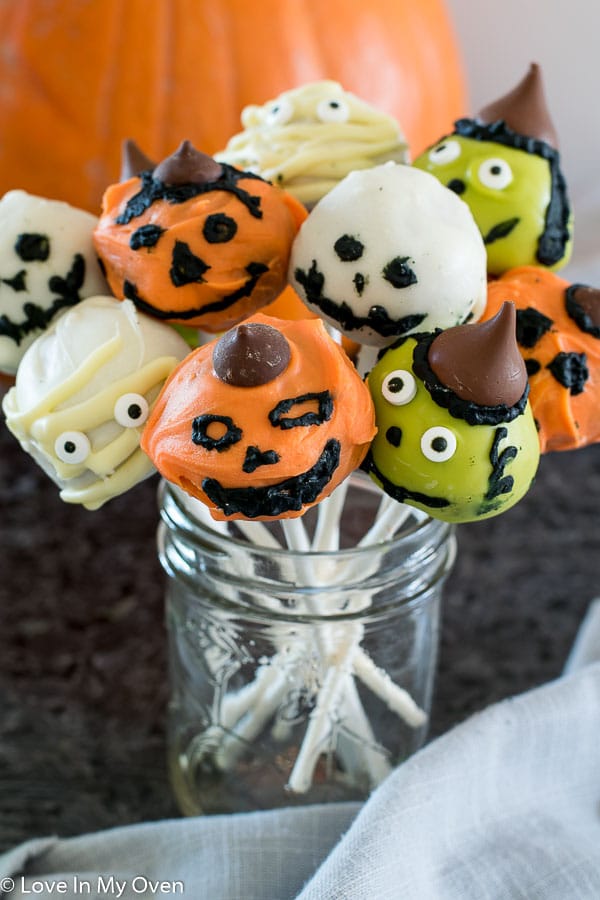
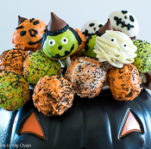
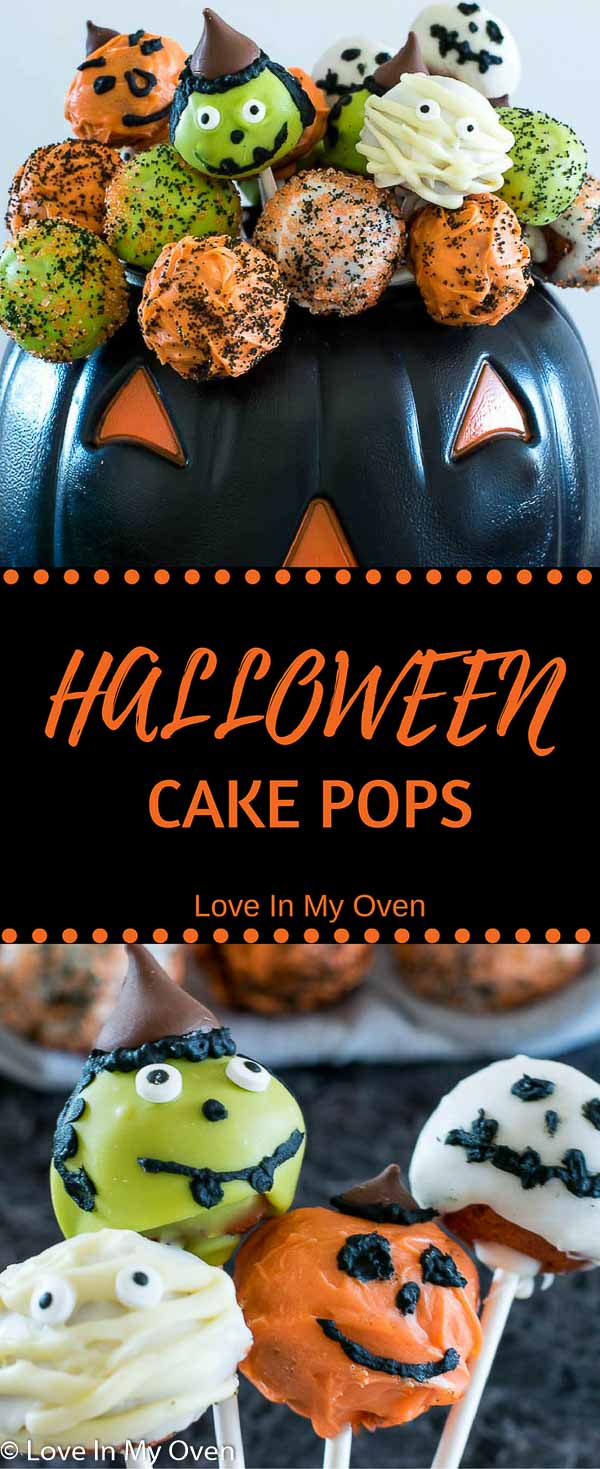
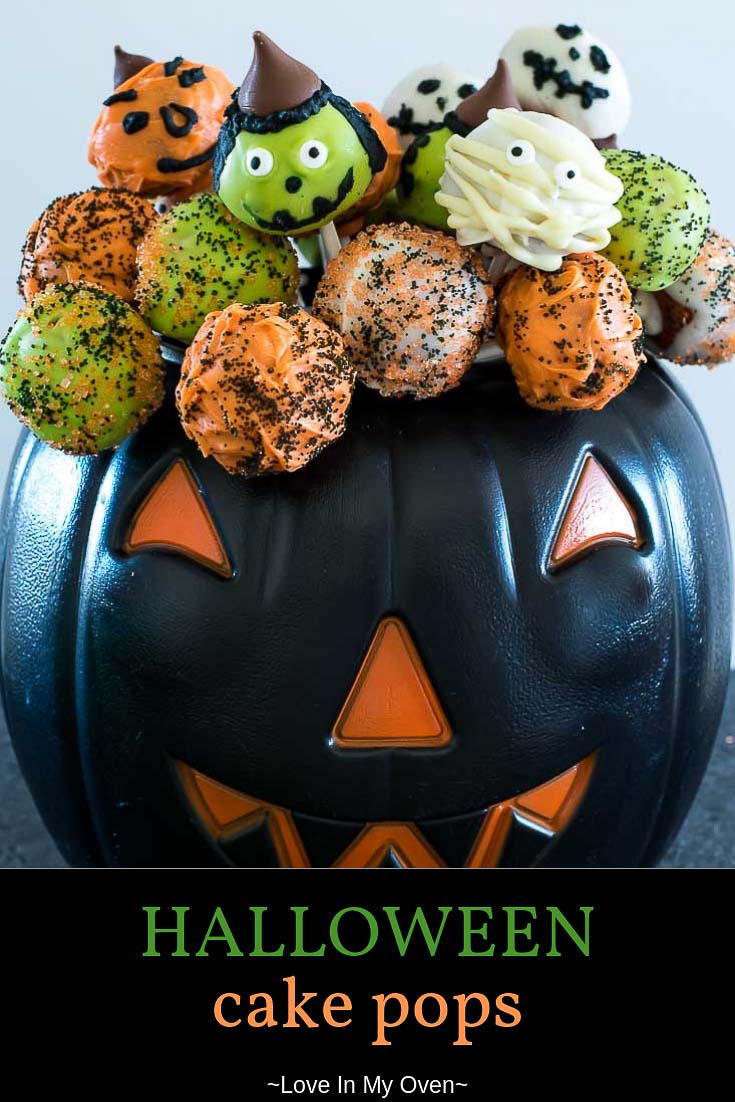
These Halloween cake pops are a fun way to treat your little ghosts and goblins this Halloween! Pumpkin cake pops with a delicious chocolate coating!
Halloween!! It’s only a week away! Where are you on the Halloween-loving scale? Some people LOVE it, some are indifferent or ambivalent, and some refuse to celebrate it. I would say I’m about a 7 on the scare scale. I love, LOVE the whole idea of it – the dressing up, the pumpkin carving, the trick-or-treating, the decorative houses and the spooky haunted house tours; however, my house has never been “that” house (you know the ones), and I am often scrambling last minute to think of a costume or buy treats. This could also just come down to my poor planning skills….
I do have some wonderful memories of Halloween growing up. My family would spend a weekend carving pumpkins, cutting out construction paper bats and pumpkins and making “ghosts” to hang from the tree, and trick-or-treating with my siblings and then friends was always so much fun. I’ve also had some epic costumes in the past…I’ve been a robot, a present, a double bubble and a kit-kat (get it, kit KAT). So clever. Last year we were Goldilocks and the three bears!
This year – I still don’t know. Etienne and I have to come up with something quick though, as we have a dress-up dinner party to attend on Saturday night. Suggestions!?
While you’re thinking of my next couple’s costume, let’s talk about these Halloween cake pops!
What are cake pops?
Cake pops are so fun! If you’ve never made them before, you’ve got to try it. They’re pretty simple, and depending on how much decorating you want to do, they’re not terribly time consuming. It’s basically just balled up cake mixed with frosting, dipped into some melted chocolate!
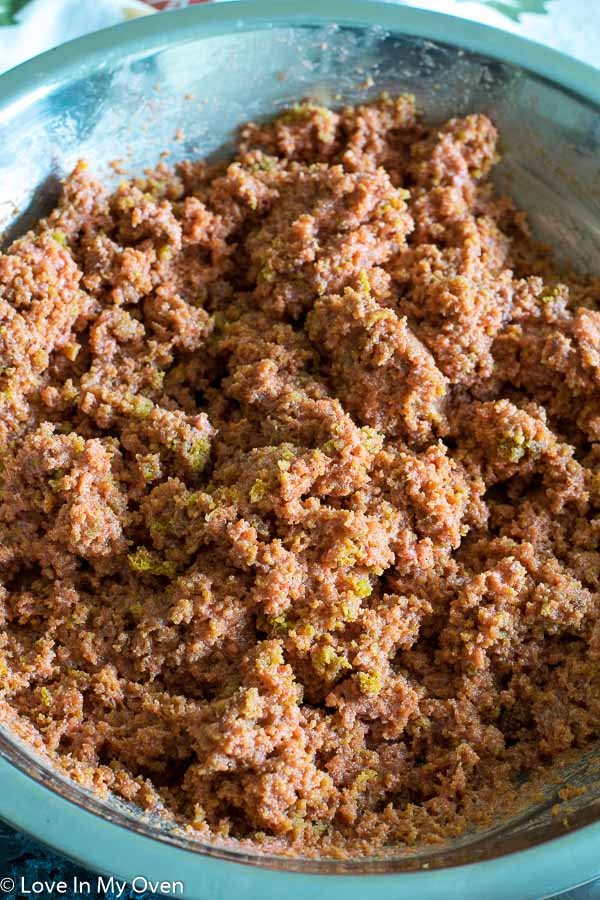
The first time I made cake pops, I was trying to come up with a way to use 2 cake layers that came crumbling out of their pans and were no longer able to form a cake. The next time that happens to you – CAKE POPS! You just continue crumbling the cake, add some frosting, roll it into balls and voila! A dippable ball of deliciousness.
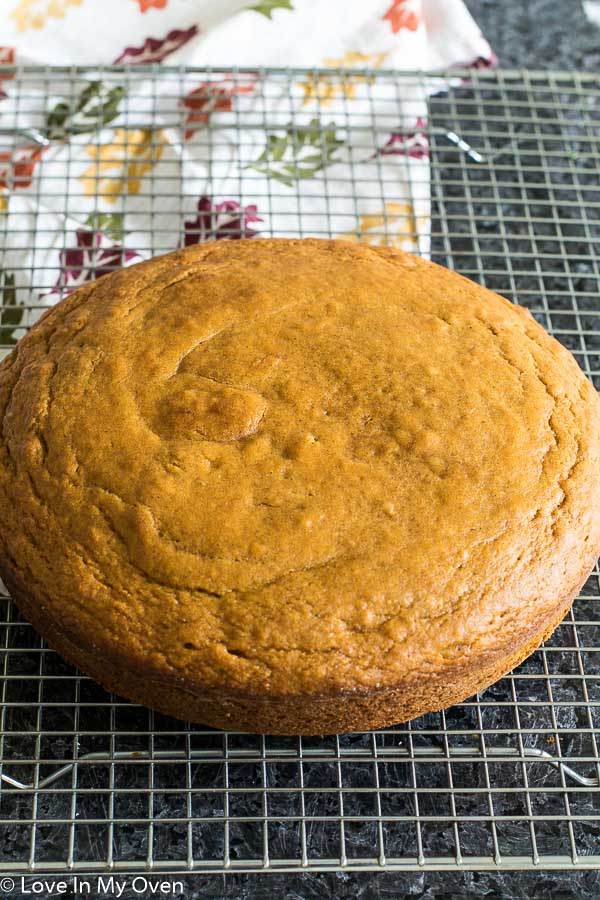
Since I did not have a cake disaster on the ready, I made a beautiful pumpkin cake for this recipe, and proceeded to destroy it.
What kind of frosting do you use for cake pops?
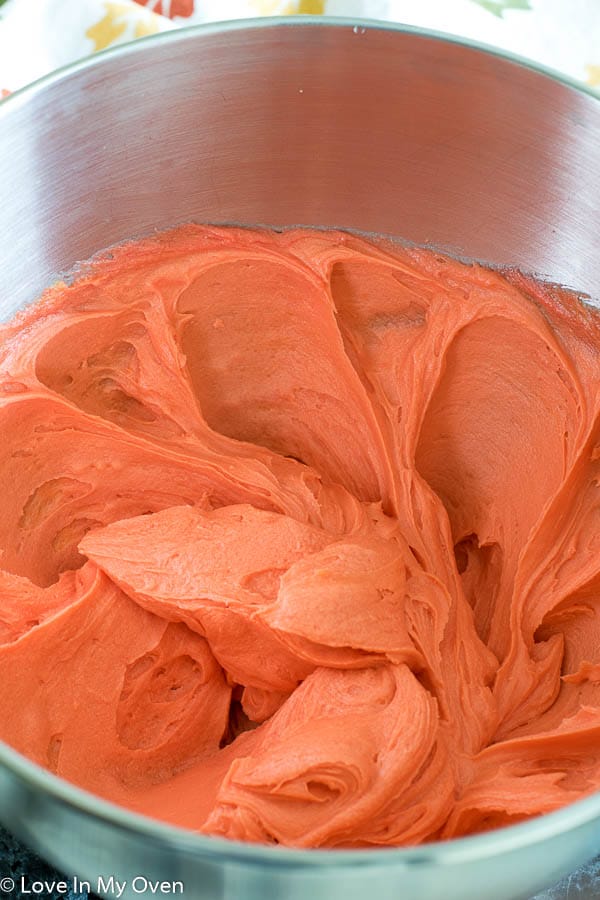
You could use any frosting for the cake pops, but I chose buttercream (making it orange, of course). I think a cream cheese frosting would be delicious too! I’ll provide instructions for the cake and frosting in the recipe below, but if you’re trying to keep things really easy, feel free to use a boxed cake mix and store-bought frosting! Just be sure to keep the ratios similar to what I’ve listed – too much frosting in the cake and you’ll end up with a soggy cake pop!
What I like to do is chill the cake/frosting combo for about an hour before rolling it into balls. It makes it easier to handle and the balls come out nice and firm….yes, I just wrote that…
What kind of chocolate do you use for dipping?
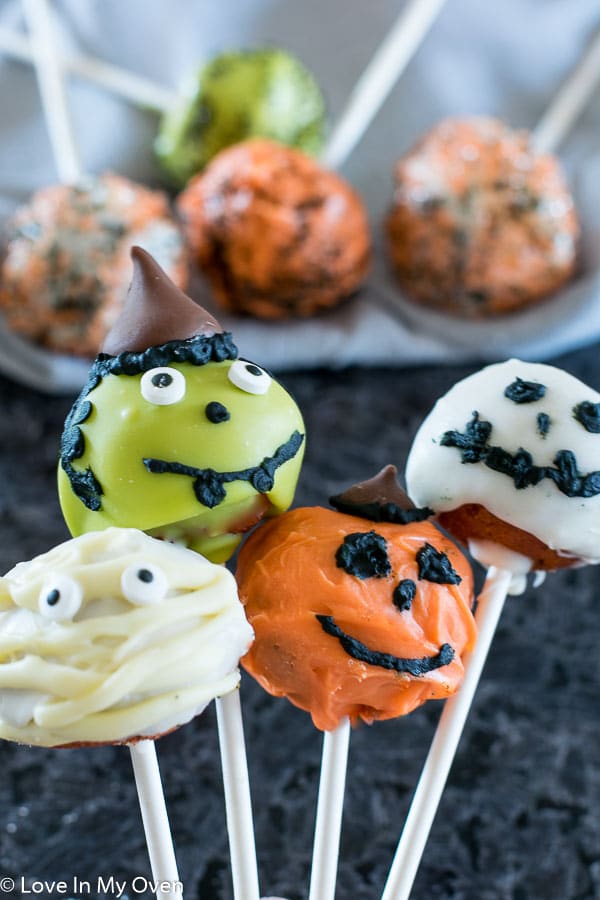
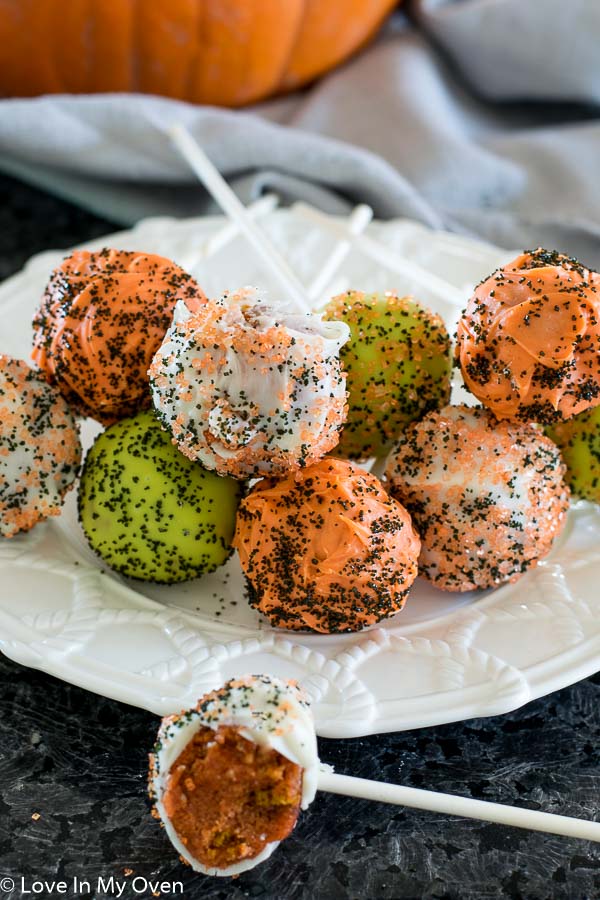
For these cake pops I used Wilton candy melts, in orange, white and green. You can really use any type of chocolate here, depending on the result you’re looking for. White chocolate is delicious, but can get expensive if you’re dipping a large quantity of cake pops.
Whatever you use, be sure to melt the chocolate enough that it has a fairly runny consistency. Sometimes overheating chocolate can make it quite stiff, and it’ll be very tough to dip. If that happens, a few drops of vegetable oil should help smooth things out!
How do you dry the cake pops without squishing them?
Well, for drying the cake pops: you could set them upside down on a parchment lined baking sheet, but then your pops will have a flattened top. What I like to do is poke tiny holes into the top of a cardboard box and set the cake pops that way, with the stick in the box. They’ll take about an hour to dry! Any sprinkles you want to add must be added immediately after dipping, but other decorations (like my skeleton faces) can be added after the fact with additional icing.
Cake pops make for a perfect gift or party treat – they’re fun, customizable and the perfect little size to snack on. They’ll keep at room temperature for a couple of days, and for much longer in the fridge/freezer.
Whether you want to make them spooky or not, keep my method in mind the next time you have a crumbly cake on your hands.
Happy Halloweening!
If you like Halloween and fall as much as I do, check out my other fall-friendly recipes!
- peekaboo pumpkin loaf
- pumpkin cake cookies
- salted caramel apple rose pie
- apple-cinnamon gin fizz
- salted caramel apple cake
Halloween Cake Pops
- Total Time: 2 hours 45 minutes
- Yield: 35-40 cake pops 1x
Description
These Halloween cake pops are a fun way to treat your little ghosts and goblins this Halloween! Pumpkin cake pops with a delicious chocolate coating!
Ingredients
Pumpkin Cake
- 1 2/3 cup all-purpose flour
- 1 tsp baking powder
- 1/2 tsp baking soda
- 1/2 tsp salt
- 1 tsp cinnamon
- 1/4 tsp nutmeg
- 3/4 cup brown sugar, lightly packed
- 1/4 cup granulated sugar
- 2 large eggs, lightly beaten
- 1/2 cup oil (grapeseed, canola, avocado)
- 1 tsp pure vanilla extract
- 1 cup pure pumpkin (not the pie filling)
- 1/2 cup milk (dairy or non-dairy is fine)
Buttercream Icing
- 1/2 cup unsalted butter, softened to room temperature
- 1 1/2 to 1 3/4 cup icing (powdered) sugar
- 2 tsp whole milk or cream
- 1–2 drops food colouring (if desired)
Coating
- 3–4 cups candy melts
- Sprinkles and/or decorative icing (as needed)
Instructions
- Make the cake! Preheat the oven to 350 F and thoroughly grease and flour a 9″ cake pan.
- Combine the flour, baking soda, baking powder, salt, cinnamon and nutmeg in a medium mixing bowl. Set aside. In another large bowl, stir together the brown and white sugar, then add the eggs and oil and whisk to combine. Add the vanilla extract, and pumpkin and stir until combined.
- Add half the dry ingredients to the wet, stirring, then add half of the milk. Stir gently. Add the remaining dry ingredients, and the remaining milk. Stir until just combined. Pour the cake batter into the floured cake pan. Place in the oven for 40-45 minutes, or until a toothpick inserted in the center comes out clean. Allow the cake to cool in the pan for 10 minutes before inverting onto a wire rack and cooling completely.
- Once the cake has cooled, crumble it into small pieces in a large bowl, using your hands to break up any large chunks.
- Make the frosting! In the bowl of a stand mixer fitting with the paddle attachment, or using a handheld electric mixer, whip the butter until smooth, about 2 minutes. Add 1 1/2 cups of icing sugar, and the milk, with the mixer on low. Once the sugar is combined, turn the mixer to high and beat for a couple more minutes. Add the additional 1/4 icing sugar if the frosting does not seem stiff enough. Add the food colouring (if using) and beat for another minute until the colour is well incorporated.
- Measure out 1 1/2 cups of frosting and place it into the bowl with the crumbled cake. Use a large wooden spoon or your hands to fully incorporate the icing into the cake. If it is too crumbly, add up to 1/4 cup more frosting. Be careful, you don’t want to make it too moist! Chill the bowl for 1 hour in the refrigerator.
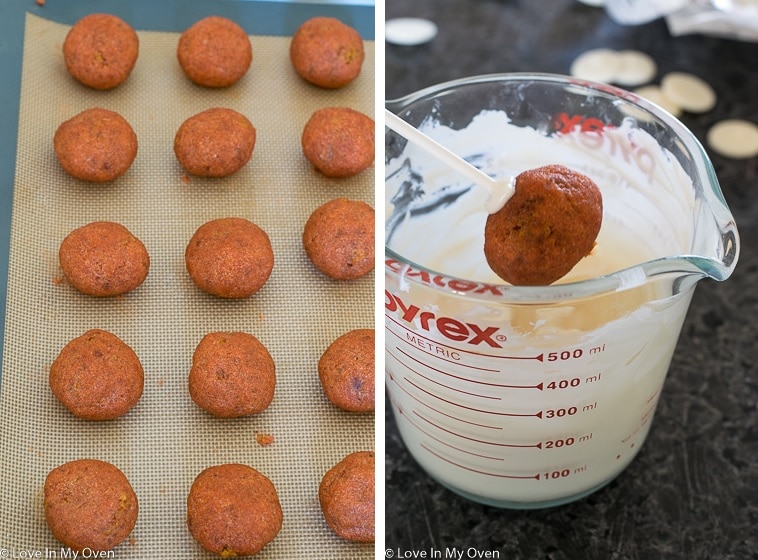
- Prepare a parchment-lined baking sheet. Using your hands, roll the cake mixture into approximately 40 balls, about 1 tbsp each. Place the prepared cake balls back into the fridge will you prepare the melted chocolate.
- I like to use a glass measuring cup (as pictured) to dunk my cake balls. I melt the chocolate in this cup, using the microwave. Be careful with the microwave, as overheating the chocolate will cause it to seize up and be virtually un-dunkable.* I like to heat it in 30 second increments, at 60% power, stirring in between until the chocolate is nice and smooth!
- Remove the cake balls. Take your cake pop stick, dip it in the melted chocolate, and insert it into the cake pop (be sure not to poke through the top)! Dunk the cake pop into the melted chocolate, gently tapping off the excess chocolate. Cover the coated pop in sprinkles if desired, then place right side up into a cardboard box (as described in the post above). Repeat with remaining cake pops.
- Cake pops take about 1 hour to dry, at which time you can decorate further or place in the fridge to enjoy for later!
Cake pops will keep at room temperature for 1-2 days, but are best if stored in the fridge. They’ll last for 4-5 days. You can also freeze them, prior to dipping or after. Thaw the balls in the fridge.
Notes
- If you’ve overheated your chocolate, try adding 1-2 tsp of vegetable (or grapeseed) oil and stirring it quickly to smooth out the texture.
- Prep Time: 1 hours
- Cook Time: 45 minutes


These are so cute Katherine….I love your decorating skills.😊..so adorable. And cake pops are such a great idea to use up a ruined cake.
Have a great fun filled weekend at the Halloween party 😊
Thank you Ashika!! I feel like my decorating is rather amateur haha so I’ll take the compliment. They’re a PERFECT idea to use up ruined cake!! Which I’ve had my fair share of 😉 Cheers!
That mummy is too cute Kathy. Cake pops are so fun and for sure a winner with the kiddos. These will vanish in the blink of an eye in my neighborhood:)
Thanks Maria!! They were so fun to make – I can’t wait to hand the out at my son’s preschool!!
These are so adorable Kathy!! I haven’t made cake pops ever..but I love how cute these are.. I definitely need to make these..And using a pumpkin cake is such a great idea since it’s fall time!
These are so darned cute! Your kids must get so excited watching you make these!!!
Thanks Liz!! They do love them, one of the more fun recipes on my site to make!!